Devices Client Installer
Troubleshooting
Verifying Installation
- Desktop Icon
To verify a completed installation the first step is to see if an icon named Card Swiper Services appears on the desktop. This does not verify the installation was correct but that it was completed. To verify a successful installation we can check the Java configuration and the FD40 drivers being used by Windows.

- Java Configurations
If the -skipJavaConfigs
option was not used then there will be Tyler Technologies specific files in
C:\%windir%\Sun\Java\Deployment. If this directory
is empty and the Java config was not skipped
something went wrong and reinstallation is recommended. Correct
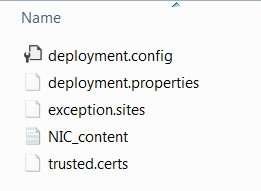
Java configuration will have the same contents as the contents
shown in the following picture.
C:\%windir%\Sun\Java\Deployment
Java Installation
Java must be installed on the host machine. The required version is Java 8. If the launcher cannot find the correct Java installation, it will not be able to start Devices Client.
Make sure that the JAVA_HOME
environment variable points to your current Java 8 installation.
In some cases a Java uninstall will leave the old (and now
nonexistent) installation in your PATH
and some methods of Java installation don't update or define
JAVA_HOME.
Windows Environment Variables
Windows' %HOMEDRIVE% and %HOMEPATH% variables must be set correctly in order for the launcher to be able to create its log file.
If you see a dialog which states "Unable to create log file." check that the combination of the HOMEDRIVE and HOMEPATH point to an existing directory, and that the current user has permissions to create files in that folder.
USB Power Options
Windows 10 includes the USB selective suspend feature that lets you automatically put USB devices in a very low-power state when they're not actively in use. It's an important feature because it helps prolong battery life on your laptop or tablet, but it may also cause problems with certain peripherals connected to your PC. If a USB device isn't working correctly, you can try to disable selective suspend on Windows 10. That may cause your computer to draw more power, but it may help to identify and fix the problem as well.
When a USB device is not working correctly with your Windows 10 PC, you can try disabling the "USB selective suspend" feature to fix the problem. To suspend feature follow these steps.
If you're changing the settings on a laptop or tablet, you'll see two options: On Battery and Plugged in, so make sure to change those settings accordingly. Once you complete these steps, Windows 10 will no longer power off USB devices connected to your computer, which can fix any problem you may have as a result of this feature. While this guide focuses on Windows 10, USB selective suspend has been around for a long time, and you can use the same steps on machines running Windows 8.1 and Windows 7.
- A quick temporary work around:
- 1. Unplug the device and plug it back in
- 2. Stop and restart the Devices Client Application
For Windows 10 Surface Pro users there are special settings that need to be changed. These changes can be harmful to your computer. If you know what you're doing, follow these steps.
Devices Client Logs
Devices Client creates a log file in a NIC directory in
the user's home directory. Inside the NIC directory there
will be a file named SwiperApp.log, this is where you can
find the output of Devices Client. This will be what the Support
Desk will ask for. Example directory location is
%USERPROFILE%/NIC/SwiperApp.log.
Reinstalling
If anything goes wrong during installation that causes Devices
Client to not be installed properly you will want to do a full
reinstall. It is extremely important to uninstall properly first.
View the Uninstalling page
for more details. From terminal use the -uninstall
option.
java -jar DC-Installer.jar.txt -uninstall- Reboot machine to remove drivers.
java -jar DC-Installer.jar.txt FD40
The previous example assumes the DC-Installer.jar.txt file is in your current directory.
File Not Found Exception
Error: java.io.FileNotFoundException: {path-to-installer}\DC-Installer.exe
This indicates anti-virus is preventing the installer file from being accessed. Either provide an exception for the installer file in the anti-virus, or place the installer in a folder which is ignored by the anti-virus.
First Data FD40
Windows 7 Not Recognizing FD40 Drivers
Windows 7 sometimes installs the FD40 driver in the wrong place,
which causes Devices Client to not recognize that the driver
exists. The correct driver name is XAC_WinUsb
and should be located under Universal Serial Bus devices.
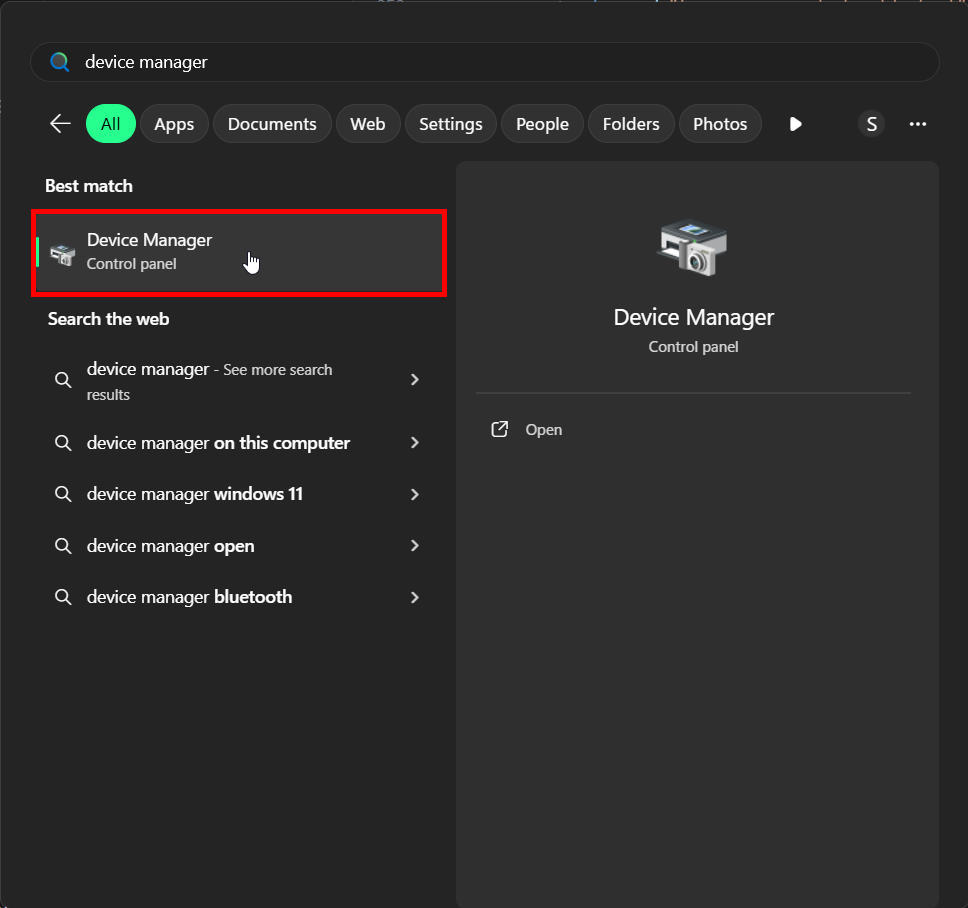
This can be verified by going to the Device Manager.
- Left click on Start
- Right click on Computer
-
Left click on Manage

-
In the menu on the right hand side select Device Manager

-
Expand the Other Devices section

-
Right click on SAIO SE USB Device

- Left click Update Driver
-
Left click on Browse My Computer For Driver Software

-
Navigate to
C:\Windows\INF
- Click Next
-
Open Devices Client and verify the FD40 is being recognized

Firmware Upgrade
Lane Drivers
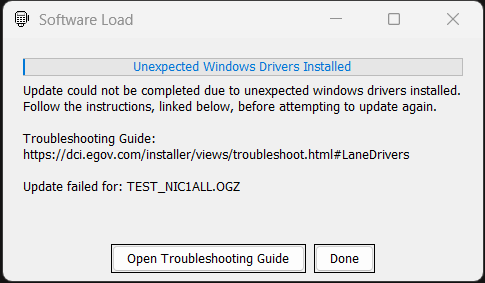
When upgrading your Lane device's firmware, specific drivers on the workstation can interfere with the upgrade process by hindering communiation between Devices Client and the Lane device. To avoid this issue, you'll need to remove the drivers. The below screen will appear to alert you to the driver issue if it's applicable.
- Open a command prompt.
-
Run the following command
pnputil /enum-drivers.
-
Find the entry that matches the below image.Specifically find the entry with the Class Guid
36fc9e60-c465-11cf-8056-444553540000and the Provider NameINGENICO.Note: theoem#.infwill be different as this is computer specific.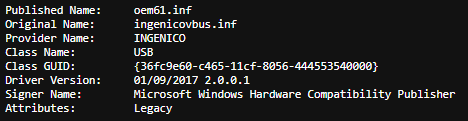
-
Save the oem#.inf for a later command.Note: in the example above it would be
oem61.inf. -
Run the following command
pnputil /delete-driver oem#.inf.Note: replace the#inoem#.infwith the number from the previous step.
-
If successful, restart the PC and re-try the device update.
pnputil /delete-driver oem#.inf
command.

Failed to delete driver package: One or more devices are presently installed using the specified INF.- Open the Windows application Device Manager.
-
Expand the section
Universal Serial Bus devices. -
Find the Lane#000 entry, right click and left click
Update driver.Note: the#in the device name will correspond to the device model (ex. Lane3000).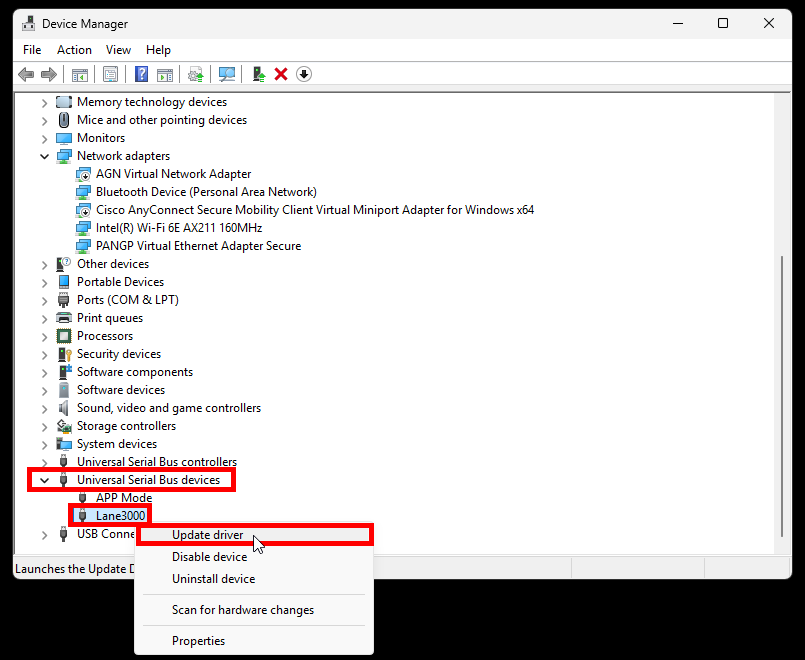
-
Click
Browse my computer for drivers.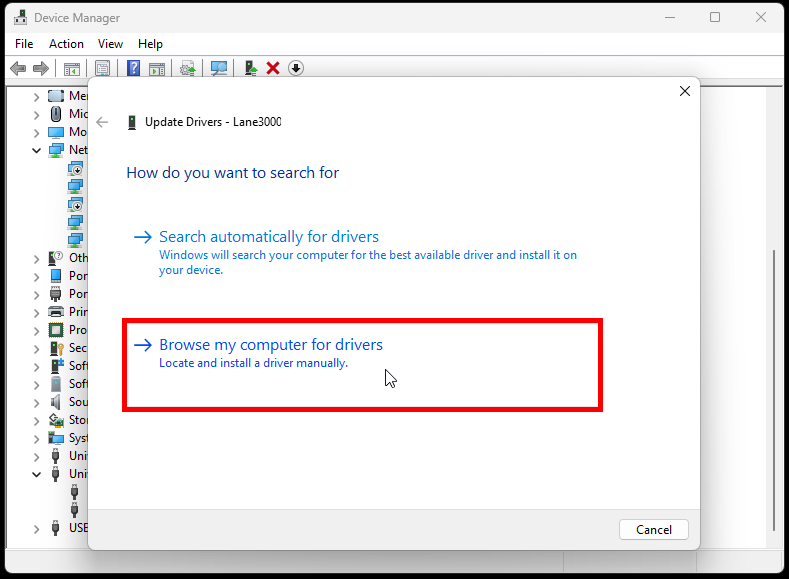
-
Click
Let me pick from a list of available drivers on my computer.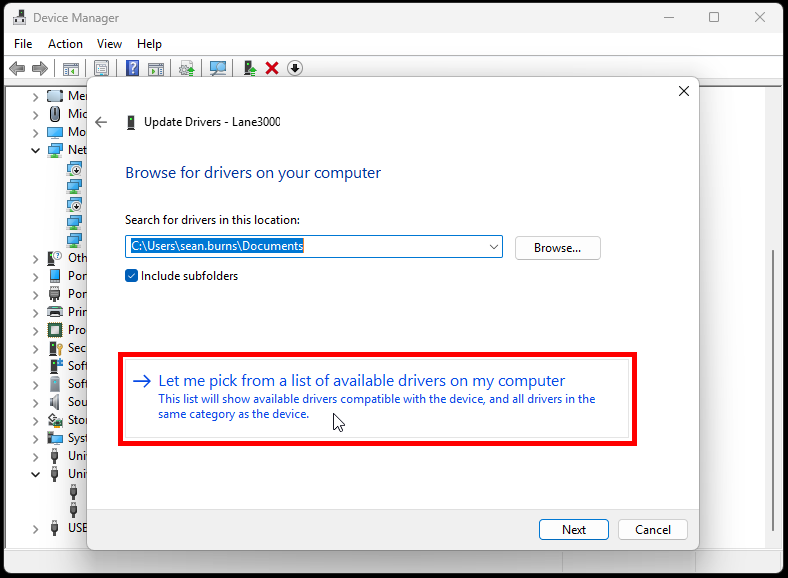
-
Click one of the
USB Serial Deviceoptions. Then clickNext.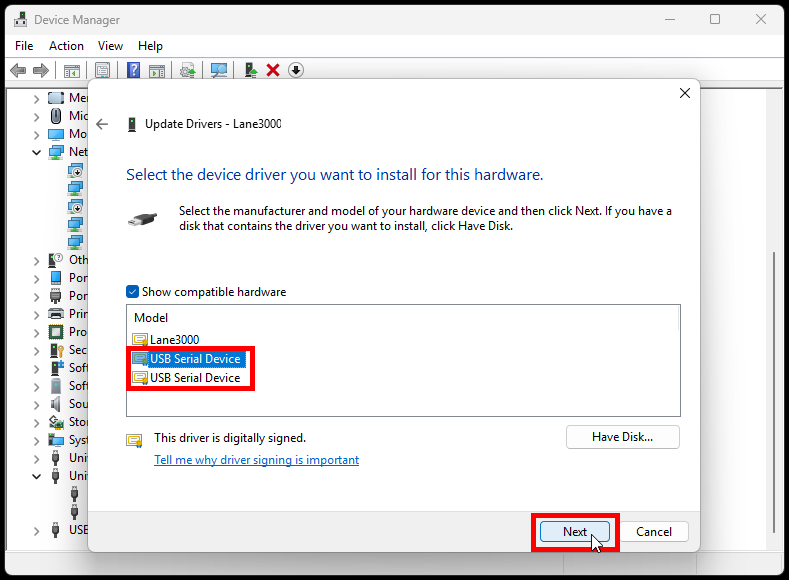
-
If successful, you should see the below screen. Click
Close.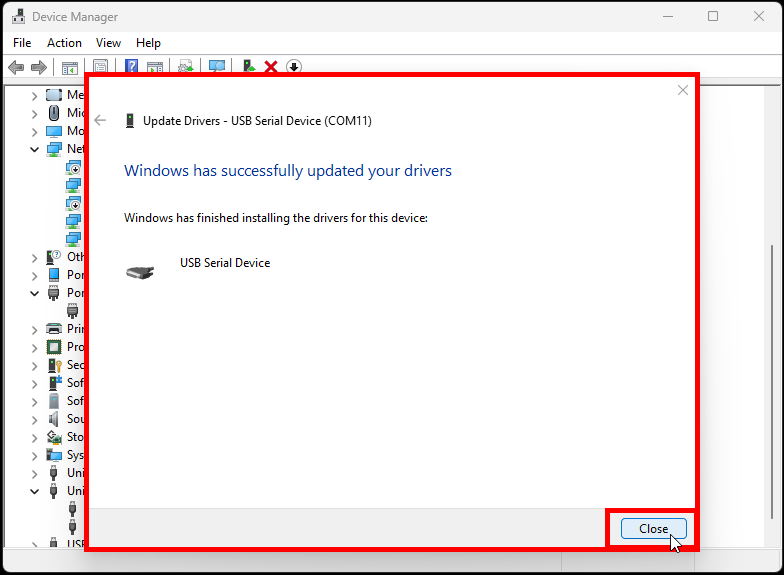
-
Reattempt the
pnputil /delete-driver oem#.infstep.Note: Step 5 from the first step list under the Firmware Upgrade - Lane Drivers section. -
Follow this step list again to swap the device driver back to the Lane#000 driver.Note: in Device Manager the device will now appear under the section
Ports (COM & LPT)and it will appear asUSB Serial Device (COM#).